
BinoMask: slitmask design for Binospec
Multislit masks for the Binospec spectrograph at the MMT telescope are designed by the proposers using BinoMask, a web based package written by Sean Moran at CfA.
This page has a tutorial / walkthrough on using BinoMask. For now this is a walkthrough of a slitmask design, notes written by Ben Weiner, with screenshots of the process. We are updating this page as needed and will add a video walkthrough if needed. To access BinoMask for trial purposes, visit the URL scheduler.mmto.arizona.edu/BinoMask/.
To actually submit a mask design, you should find an email titled “MMT Observatory Queue Observing Form” that the MMT Scheduler sent you prior to the run, and click the link in that email to log into your account on the MMT queue catalog server. From your catalog page, make a new target, choose slitmask, and you will be sent to BinoMask. This process is necessary to associate your mask design with the correct catalog, PI, and observing run.
However, if you want a collaborator to have access to your queue catalog to be able to edit targets and design masks, you can forward them the email with the catalog link. Be careful with this link, since anyone with the link can edit that catalog.
Before you begin mask design
You will need to have:
- Your mask center coordinates (RA, Dec; or object name if NED/SIMBAD can resolve it).
- Any constraints on PA, observing date, slit sizes, and other parameters.
- A catalog of targets, ideally on the GAIA or GSC2 astrometric system. See below under “Target List” for the file format.
- If your catalog is not on GAIA/GSC2 then you will need to provide a separate catalog of guide stars.
The BinoMask software is web based, so you need an Internet connection and a modern browser, but don’t have to download/install anything.
BinoMask walkthrough
Contents
- Log in to the queue system and launch BinoMask
- Mask configuration
- Reference (background) image
- Loading a target list
- Selecting guide star catalog
- Generate slits on objects
- Submitting the mask to your queue area
- Adding the target (observing block) to your queue catalog
- Special topics
- Troubleshooting
1. Log in and launch BinoMask
When you get Binospec time, the MMT/Binospec queue will send you a linknto sign in and administer your program. Or you can go to http://scheduler.mmto.arizona.edu/ and log in. Then click through: Queue Observing Form > Access Catalog Editor > New Target. This will open a “wizard” to help you specify the type of observation. Try clicking Mask > Create New Mask > Launch BinoMask. (If it gives you a warning about leaving the page without saving data, click ok to leave the page.) This will start the BinoMask design software running on scheduler.mmto.arizona.edu. (If you have difficulty here, see the “Troubleshooting” section at bottom of the page.)
The BinoMask page has a header saying “BinoMask MMT Observatory [observer name]”, a list of actions in the left column, and a main sky image window in lower right. If you get a JS9 error message and/or the sky window is blank, try clicking the “BinoMask” at upper left to start it. Scrolling down in the sky window will show the assigned target table, which at first is empty.
2. Mask Configuration
To begin designing a mask, click Mask Configuration at top of the left column. A data entry window will pop out to the right. Enter a mask name; then enter RA/Dec, or try lookup by name (likely to work on names resolvable by NED/SIMBAD, e.g. NGC galaxies), observation date, grating and central wavelength, and click “Update Display.” The image window should update to show your field. Note you may need to scroll up/down to see everything in the Mask Configuration pop-out. To close it click the X in upper right corner.
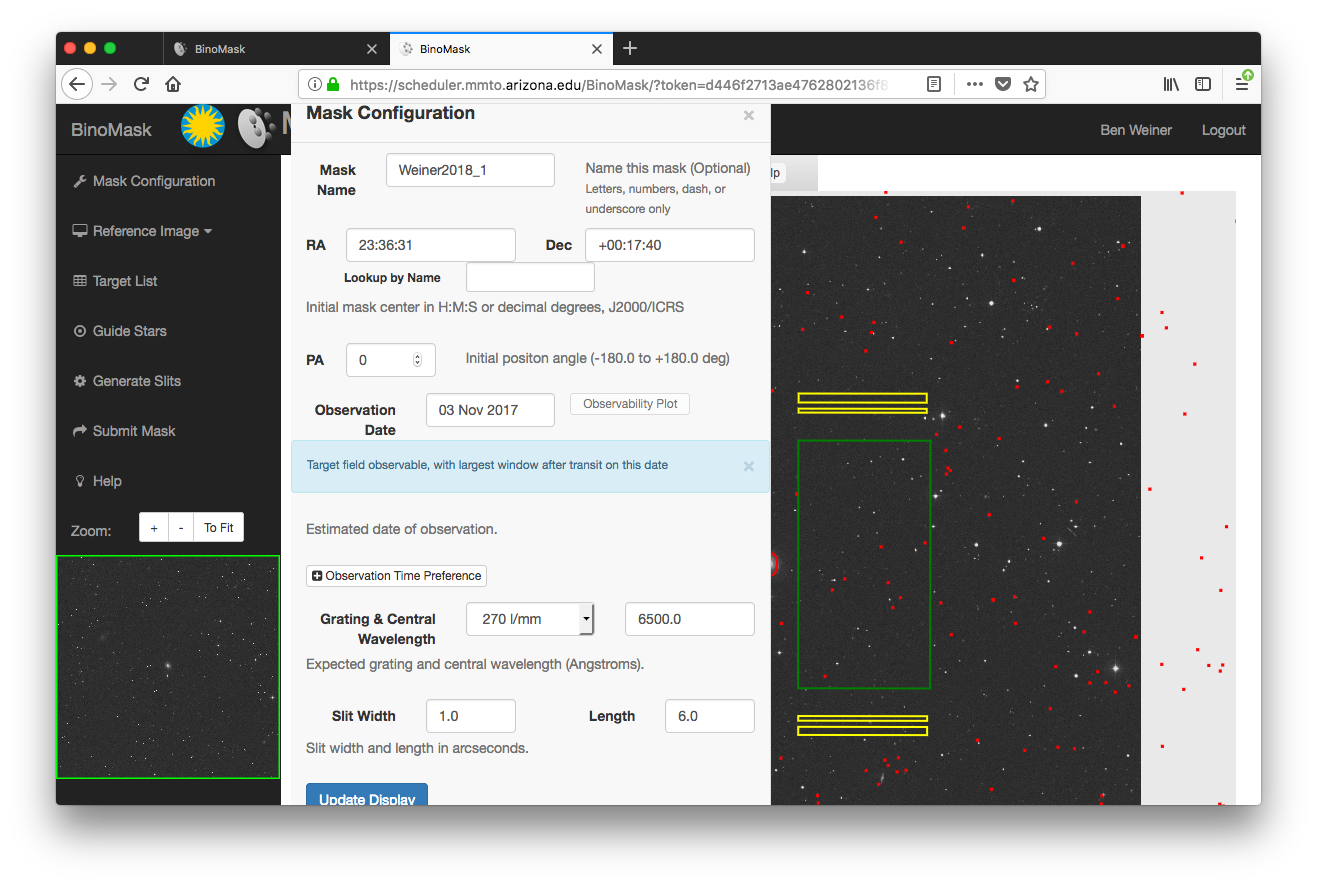
The tab for setting up your mask configuration: name, coordinates, PA, etc.
Overlaid on the sky image, there is a red oval at the center of the Bino field. You can click and drag it to move the Binospec pointing center. Clicking the red oval will show a red “handle” point – dragging this will rotate the Binospec pointing. Large green boxes show the Binospec fields of view, small yellow boxes show the alignment star regions, and a large blue box to the side shows the guider/WFS patrol region. If you drag the field toward the edge and want to refresh the background image, go to the Mask Configuration tab and click Update Display to recenter on the current mask center.
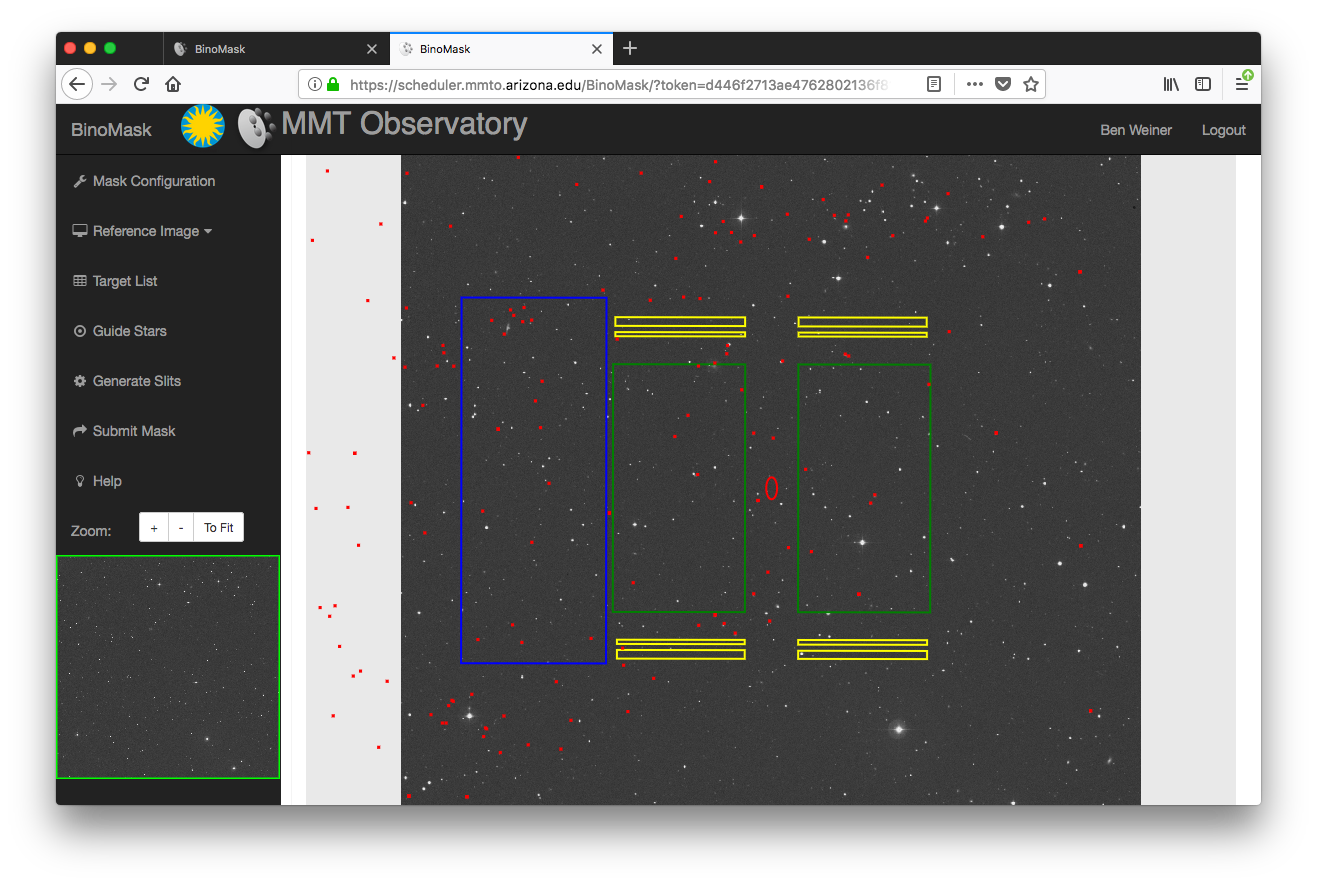
With the Mask Configuration tab closed, you can see the Binospec field of view on the sky, and click the red oval at center to move and rotate the field. The position and PA in the Mask Configuration tab will update to reflect your changes.
The Mask Configuration tab is also where you set slit width and length. At present, these are global values. As an aid, the MMT web site states that the median seeing is in the range of 0.77″ – 0.85″ based on data from 2003 to the present. 1 arcsecond wide slits are a good starting point, and 6 arcseconds is a good minimum length to ensure sky subtraction.
3. Reference (background) Image
Under the “Reference Image” heading in the left column, there are tools for: uploading a local image to use as backdrop; refreshing the mask overlay of the Bino field; and show/hide control buttons in the image window. The image control buttons are DS9-ish file, view, zoom, scale, color, regions, WCS, analysis, help. You can, for example, zoom out if your catalog contains objects over a larger area than the default view. If you’re happy with the default, you don’t need to change anything in this tab.
4. Loading a Target List
Clicking “Target List” on the left pops out a window to upload a list of targets. The first line should be a header with column names selected from (lowercase only):
name,ra,dec,magnitude,priority,pm-ra,pm-dec,epoch,type
Only ra and dec are required, but name, magnitude, priority are recommended. Priorities are 1-highest, 2-next, …. You then choose comma or tab delimited for the table. The RA, Dec can be in either HMS or decimal degrees, i.e. (1) hh:mm:ss, dd:mm:ss ; or (2) ddd.dddd, dd.dddd . Type should be 1 (or “target”), 2 (“sky”) or 3 (“standard”). You can use types 2 and 3 to designate slits as blank sky, or standard stars (TBD: is this used in the reduction process?) The targets will be plotted as red points. Once your target list is loaded, you can scroll down in the tab to see it under the heading “Current Target List.”
Note that the target table must be comma or tab delimited, and currently must not include any extra whitespace in the header line – so ‘name,ra,dec,mag’ works, but ‘name, ra, dec, mag’ won’t. We will fix this to ignore extra whitespace in the near future. (Whitespace in the catalog lines should be ok, just not in the header line.)
Object priorities can be 1-most important, 2-next most, and so on. The mask designer will try to optimize the sum of N_rank * 10^-rank, so a priority 1 object counts 10 times as much as a priority 2 object, and so on. Using all-integer priorities will work; using all-float priorities should work (to be tested); and mixing integers and floats in the priority column currently will cause an error during slit placement.
An RA or Dec value that is exactly an integer, such as 40.0000 degrees, will also cause an error when placing slits. (This is because the javascript front end types it as an integer and mixes it into an array of floats, which causes a problem when parsed by the backend.) You can solve this by adding a tiny amount to the coordinate, such as 40.00001 degrees.
Proper motions for BinoMask and MMIRSMask are in mas/yr, not the seconds/century that the MMT object catalogs use.
Target List Best Practices
- Objects need to be on a common astrometric frame, and this frame needs to be either compatible with Gaia (SDSS is close enough), or you need to supply a catalog of guide stars on this frame (see below).
- Objects should span a limited range of magnitudes, otherwise bright targets will bleed into fainter targets on adjacent slits, and possibly even saturate.
- Objects should have a bright magnitude limit – exact value depends on exposure length, but g or r mag of 15-16 is probably a good starting point.
- (To be updated based on further experience with data processing.)
- A limitation of Javascript vs IDL data typing means that mixing integer and float data causes placing slits to fail. To avoid this:
- 1. Do not mix integer and non-integer priorities. They need to be all integers or all floats, and values such as “2.0” will be read as integers (but 2.001 is okay).
- 2. Watch out for RA and Dec that happen to be exactly integer, such as Dec = 40.0000. This will cause a failure. You can add a tiny amount to the coordinate, eg 40.00001, which moves the object by a negligible amount but forces the parser to read it as a float.
- Please include objects over a large enough area that there is at least one target in each side of Binospec. If there are no slits on one side of Binospec, it causes problems in the reduction pipeline.
Very Important! Catalog reference frame
If your target catalog is in the GAIA reference frame (or optionally GSC2), then BinoMask can find suitable guide and WFS stars for you. If not, you must create a second catalog with such stars on the same coordinate system as your targets, extending to at least 0.4 degree in radius from the center of your target field. For guide stars, please select a magnitude range of r=14-18; for WFS stars, magnitude r=11-14. This is very important because if you don’t get the catalog reference frame right, the mask alignment using the guide stars will not get the slits onto your targets.
This star catalog must include the magnitude column or guide selection will fail. (If absolutely necessary, you can fake this by setting all WFS stars to mag=13 and all guide stars to mag=15, but you should have the magnitudes that you used to select the stars anyway.) You’ll load this catalog in the next step.
TODO: we will find some resources for transforming catalogs from common reference frames to the GAIA frame and provide links here. For the moment, one way to address this is to take stars from your catalog and cross-match them to the GAIA catalog. The CDS has a table cross matching web service (may be slow to render) and the University of Heidelberg’s GAIA DR1 page gives an example of how to do a GAIA-to-user table crossmatch with a client such as TOPCAT. You can also query the GAIA catalog using Vizier to do a search in a region around your field; start from GAIA DR2 Vizier.
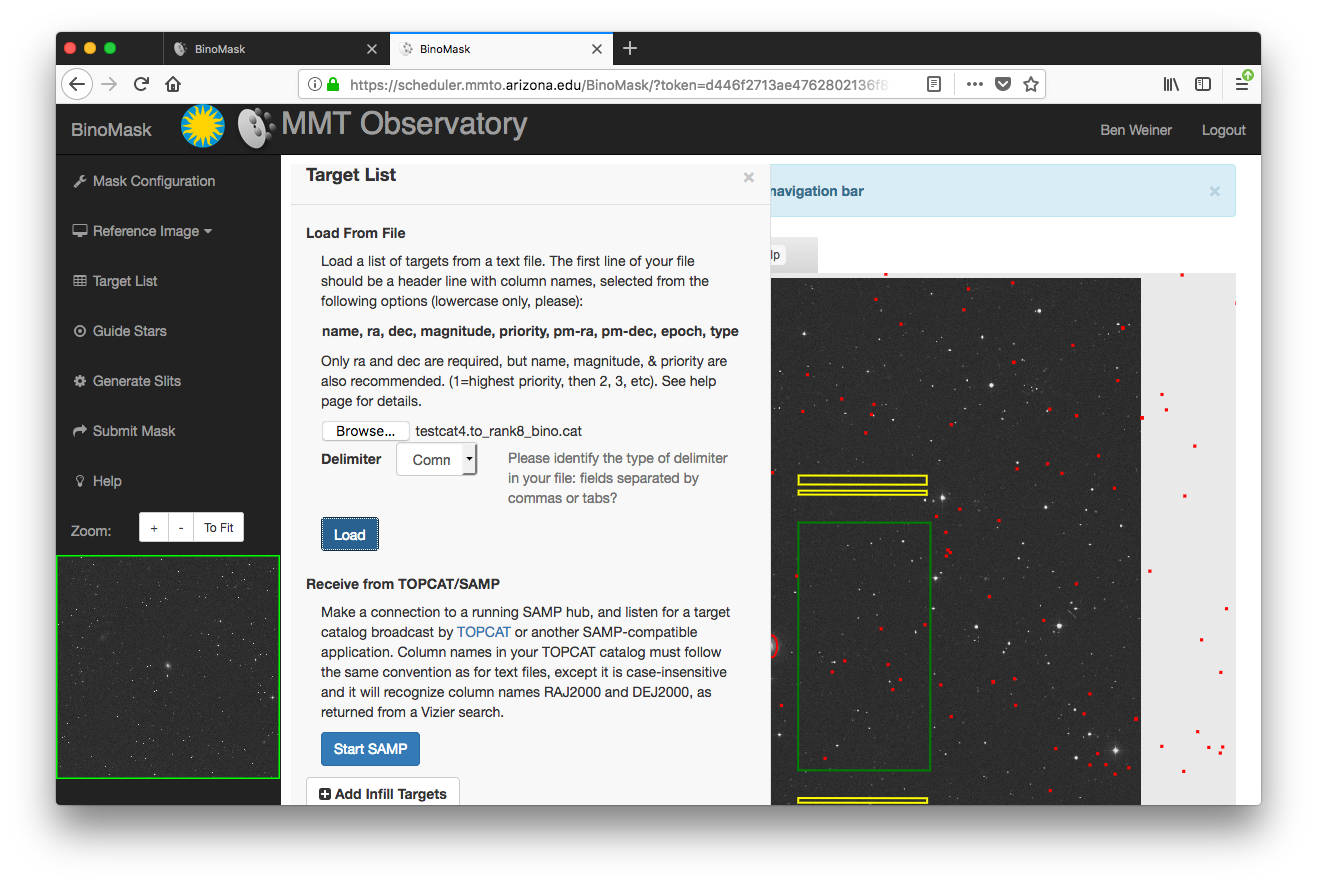
The tab for loading your target list.
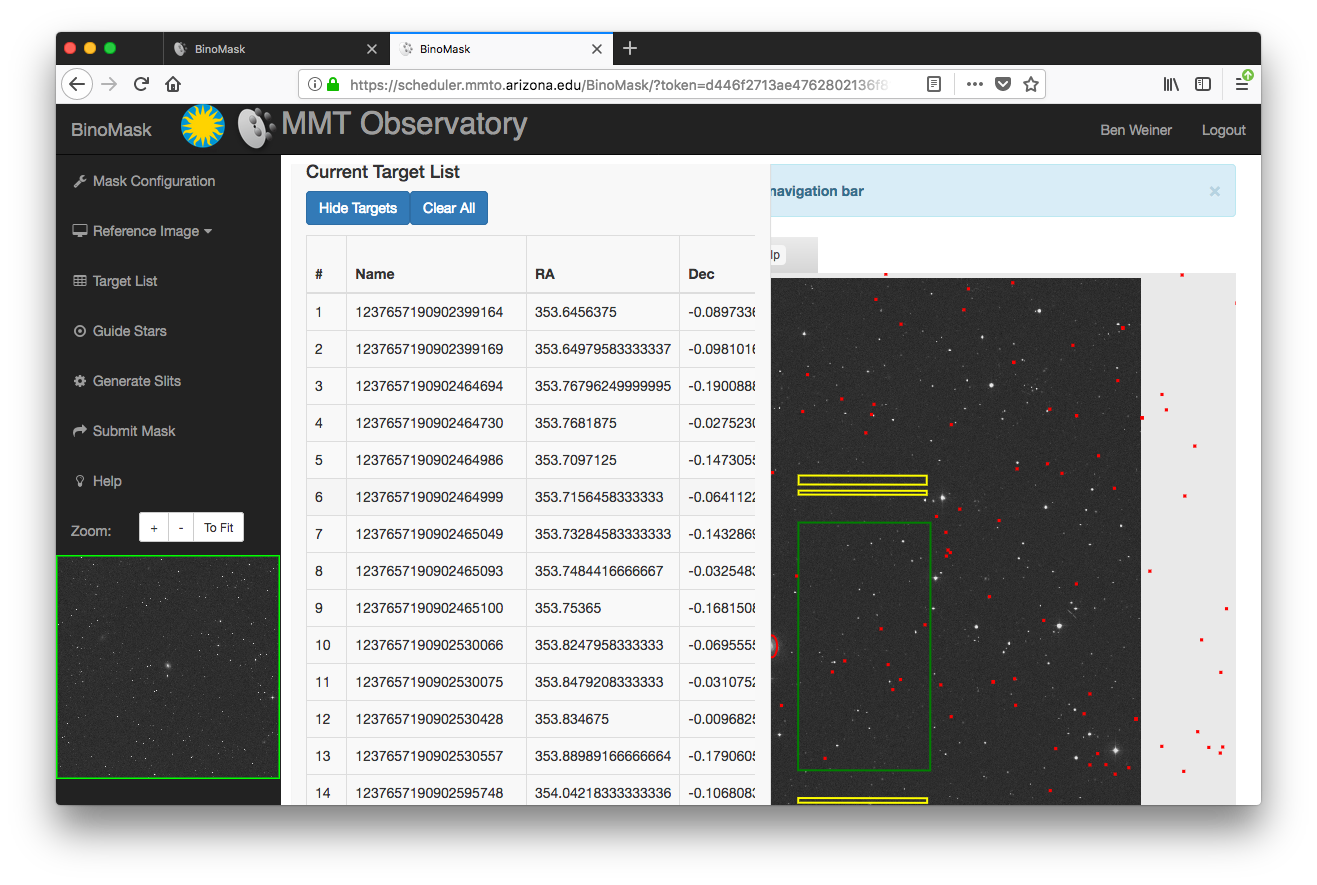
Scrolled down to show a target list after loading it.
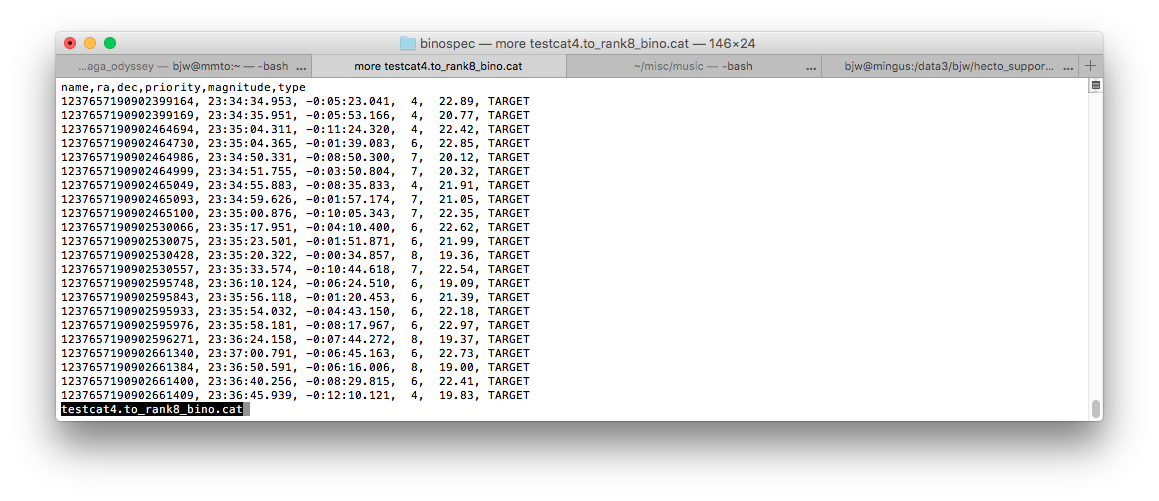
The beginning of my target catalog text file, to show the format – CSV in this case.
A forthcoming feature will be to import a catalog broadcast over SAMP from e.g. TOPCAT, with mostly similar format requirements, but this is not yet working with https.
5. Selecting/Providing a Guide Star catalog
The “Guide Box” pop out allows you to load stars from GAIA or GSC2 catalogs; you must choose the catalog whose reference frame matches your target catalog. You can also load guide stars from a file, change guide box size, or disable strict checking if absolutely necessary. Click “Retrieve” to get a list of guide stars. The guide stars will be plotted as blue points. You have to scroll down in the tab to see the list of guide stars after it was retrieved.
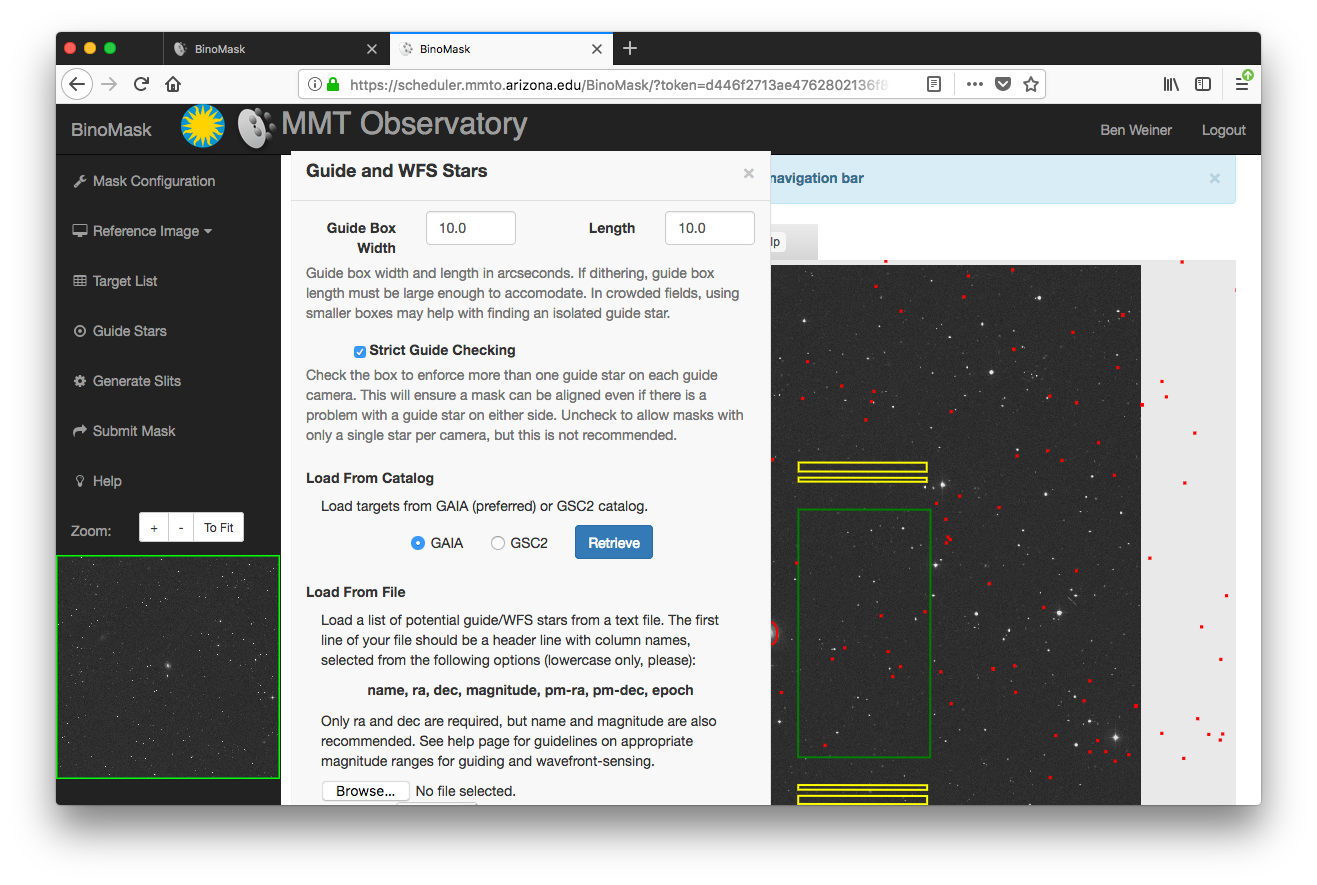
The tab for selecting a guide star catalog.
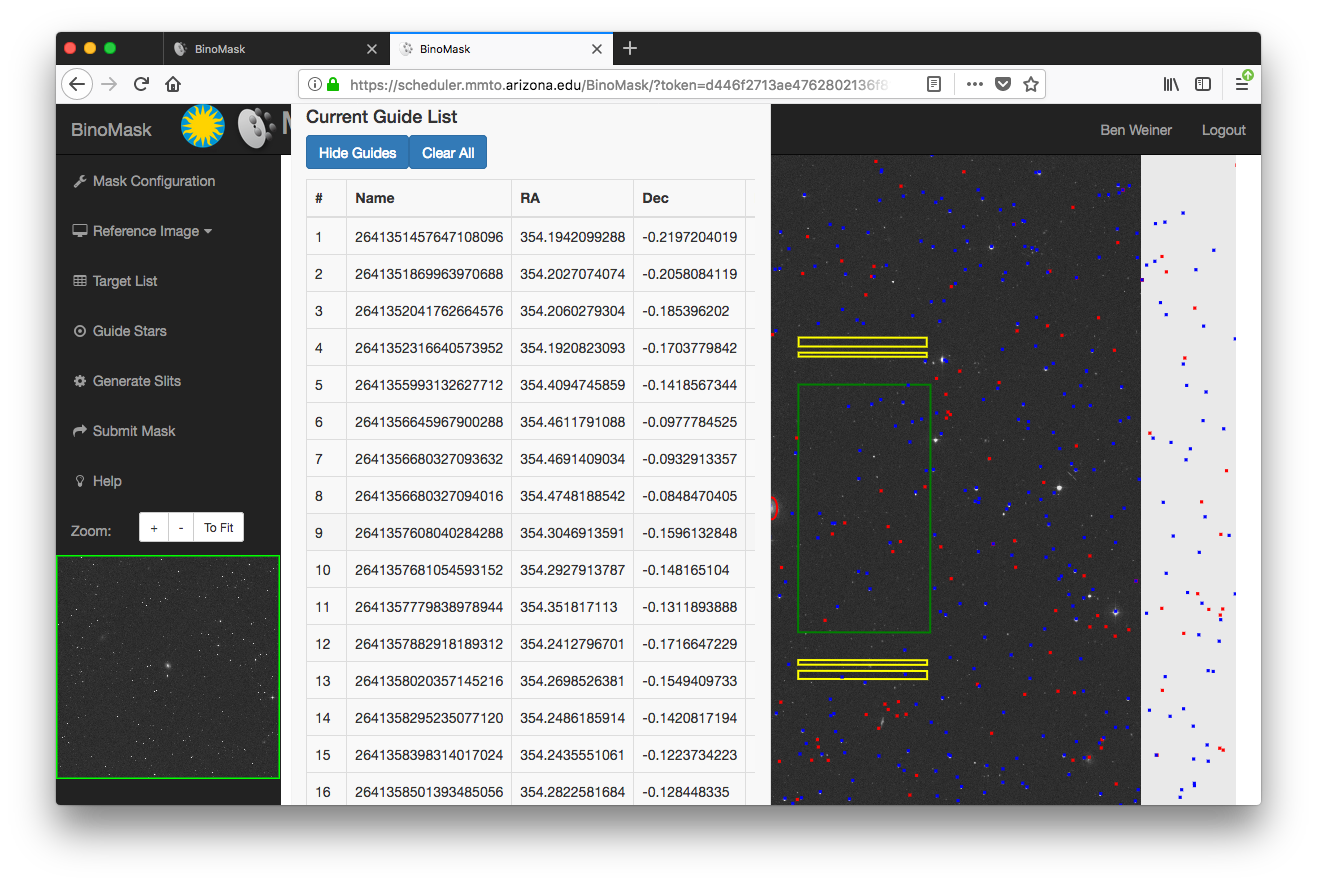
Scrolled down to show the list of guide stars after it was generated by BinoMask (using GAIA coordinates).
On rare occasions we have had problems with an outage at CDS where Binomask’s query fails to return GAIA stars. If this happens (unlikely), you can get a list of GAIA stars from one of the mirrors, such as GAIA DR2 Vizier. See the page on Binomask special topics.
6. Generate Slits on objects
The “Generate Slits” pop out will assign slits to objects in your catalog. You can let it vary the instrument PA freely, specify a range of PA to allow, or fix it to the current value. You can also let it vary the mask center position in RA and Dec. You can choose the goal to optimize: most uniform wavelength coverage, maximum slit packing, or fully random selection.
Click the “Place Slits” button to start the process. Once Binomask has produced slit assignments, it will populate the “Targets Assigned” table below the sky view. You have to scroll down in the Generate Slits tab to see this “Targets Assigned” table. The selected targets and guide stars will now be shown on the image. Cyan outlines of slits and guide star boxes are drawn on the image.
(Binomask properly takes account of effects like optical distortion and differential atmospheric refraction at the selected time of observation to place the slits on the correct physical location on the mask. However, the translation from physical units back to sky coordinates in the display is approximate. So if you zoom in on the JS9 display, you may see slits in the corners of the mask drawn offset from the targets by 1-2 arcsec. This is normal and is only a display issue; the mask will be cut correctly.)
Varying the PA: Binomask will take account of what PAs are observable when your field is up and will avoid PAs that take your mask too close to the rotator limits during the observing window (either before or after transit, depending on which has a longer observable window) . So it’s generally a good idea to let Binomask optimize the PA. If you need to constrain the PA, it may complain if the PAs are too close to the rotator limits.
It is good practice to avoid mask position angles that run into the rotator limits (which are near +175/-175). Binomask will try to avoid PAs that hit the limits in the middle of your observing window. In practice, the limits mean that: to avoid hitting the limit at transit, for masks that are north of the MMT (Dec > +33), you should avoid position angles near 0. For masks south of the MMT (Dec < +33), you should avoid PAs near +180 or -180.
Varying the mask center: Binomask can try a grid search of 5×5 centers in RA/Dec over a range you specify (eg 2×2 arcmin) to optimize the number of targets placed on slits. However, this slows down the slit placing step by a
factor of 25, and currently may lead to timeout errors if you have a large target catalog.
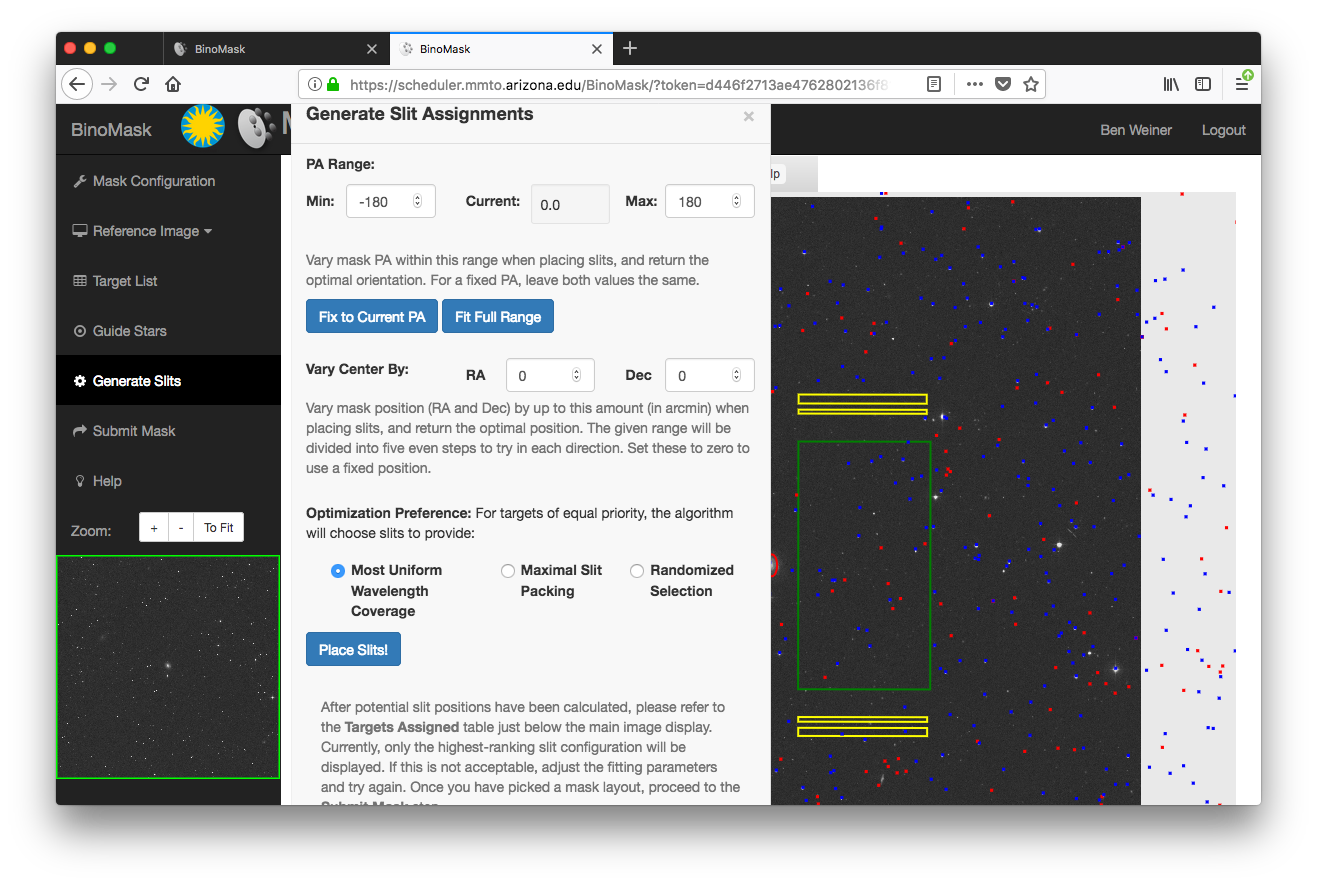
The tab for generating slits, in which Binomask selects objects to be placed on slits, maximizing criteria that you select.
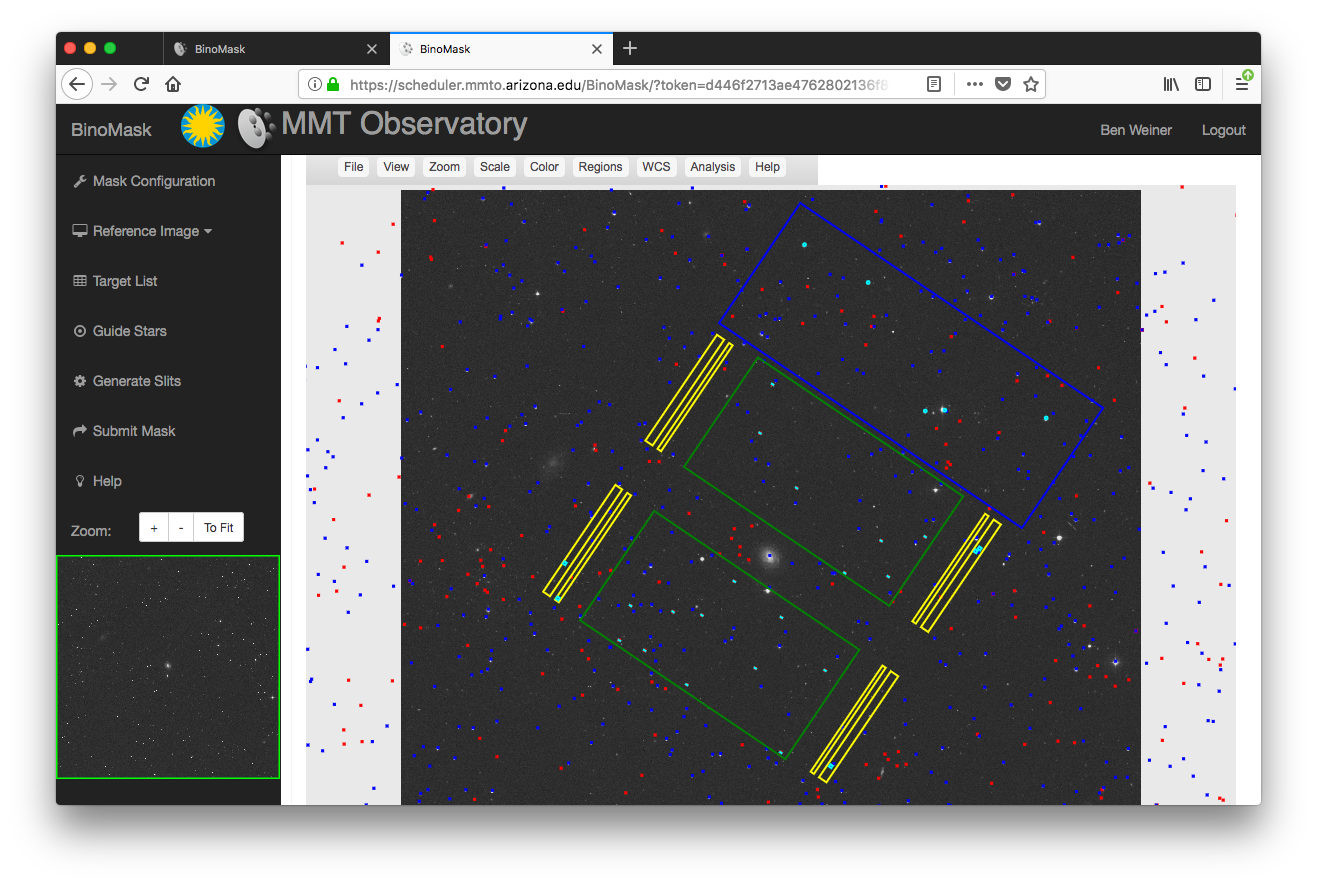
A display of the first trial of generated slits. Here I let it vary the PA but not the pointing center, and selected the maximum wavelength coverage option.
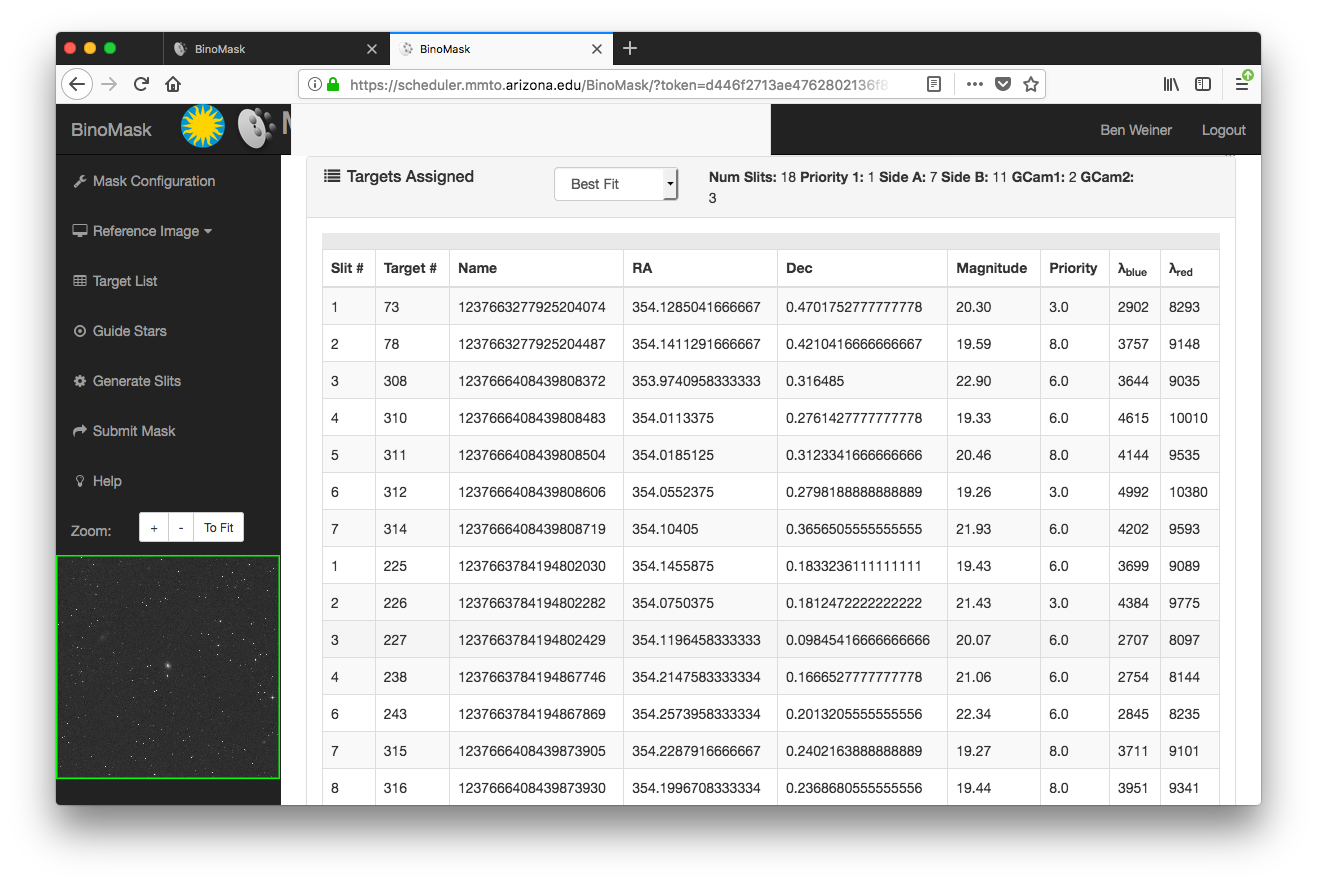
Scrolled down to show the table of targets assigned to slits in the first trial.
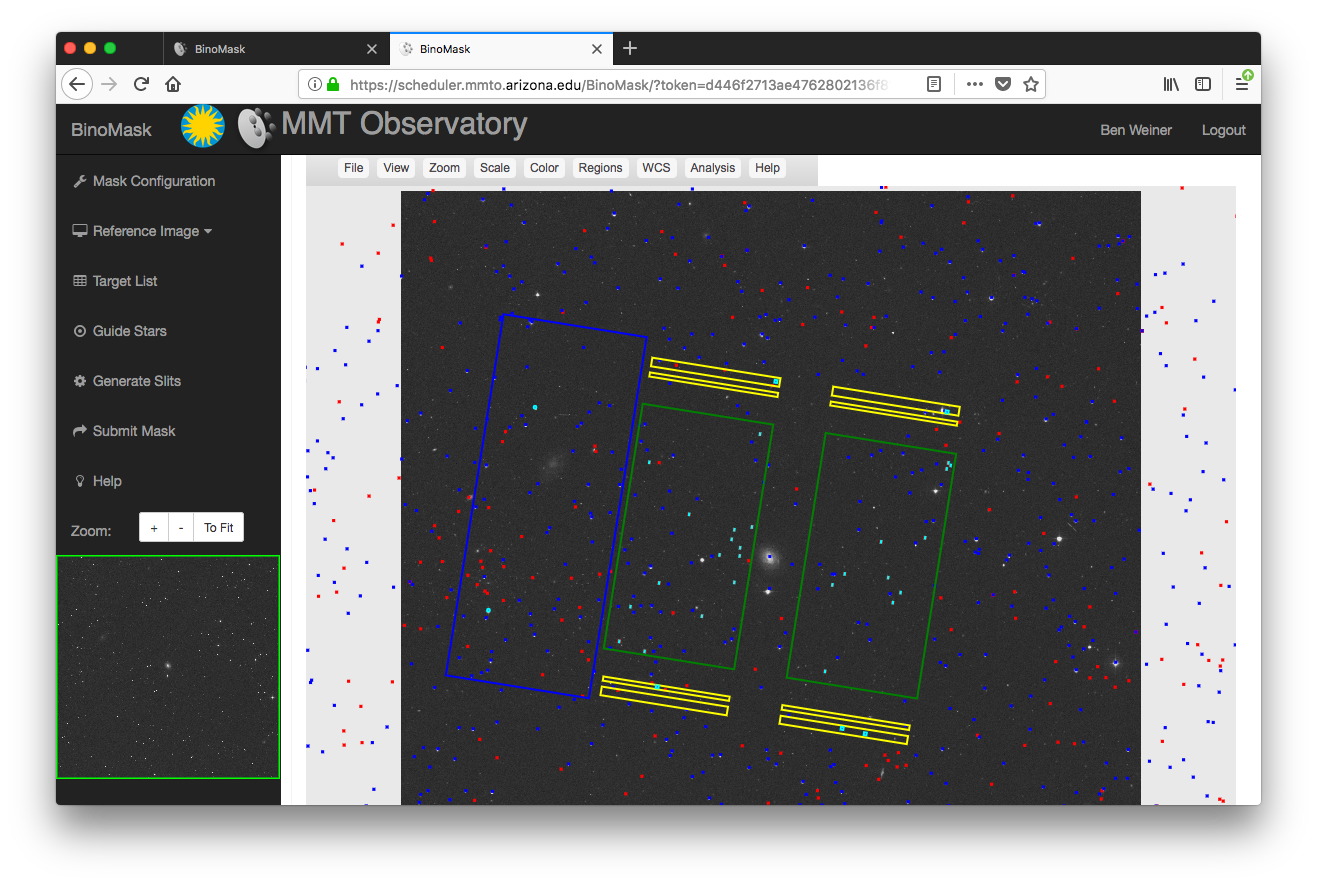
Second trial of generated slits. Here I let it vary the PA and allow the pointing center to shift by 1 arcmin in both RA and Dec, and selected the maximum number of objects option.

Scrolled down to show the table of targets assigned to slits in the second trial.
If you want to get a summary of how many objects in each priority were assigned to slits, use your browser to copy/paste the target table into a text file named e.g. “targetlist”. Then run this unix command:
awk '{print $7}' targetlist | sort | uniq -c
This should work if the copy/paste preserved rows so that the priority is in column 7 of the text file.
- It would be useful to download the selected targets table as a csv or similar, and this feature is slated for addition.
- It may be helpful to show the parallactic angle in this panel where we can choose the position angle range. However, because there is an ADC (atmospheric dispersion compensator), the parallactic effect is mostly differential across the field rather than dispersing light out of each slit. We are working on how to visualize this. Slit widths are also set by the user. As an aid, the MMT web site states that the median seeing is in the range of 0.77″ – 0.85″ based on data from 2003 to the present. 1 arcsecond slits are a good starting point.
You may get the error “slits can not be made” which often occurs because the rotator setting is not correct. Try adding or subtracting 180 from the present setting.
Note that if you redesign a mask repeatedly and allow it to vary the mask center each time, the center can wander away from the original coordinates. To recenter it, go back to the Mask Configuration tab.
7. Submitting Your Mask
Finally, click the “Submit Mask” header to get a pop out that allows you to submit the mask design. You can also use this pop out to: make another mask using unassigned targets from your catalog; clear and start over ; or to save and load mask files to local disk. Note that you can save an unsubmitted mask, load it and submit, but you can’t edit/change it before submission.
After submitting, you can choose to design more masks, or be sent back to the MMT Queue Catalog page.
If you want to design multiple masks to tile a field or to overlap for greater coverage (eg second mask gets targets that could not be assigned on the first mask), then you should make the first mask, submit it, and choose “Make Another.” This will send you back to the beginning. Choose your new mask center and go through the steps, and keep the existing target catalog rather than loading it again. BinoMask keeps track of what objects have already been assigned, and it will make the second mask using only objects that were not on the first mask (and similarly if you make a third mask, etc). So you can design multiple masks to cover a field, as long as you do them all in the same design session.
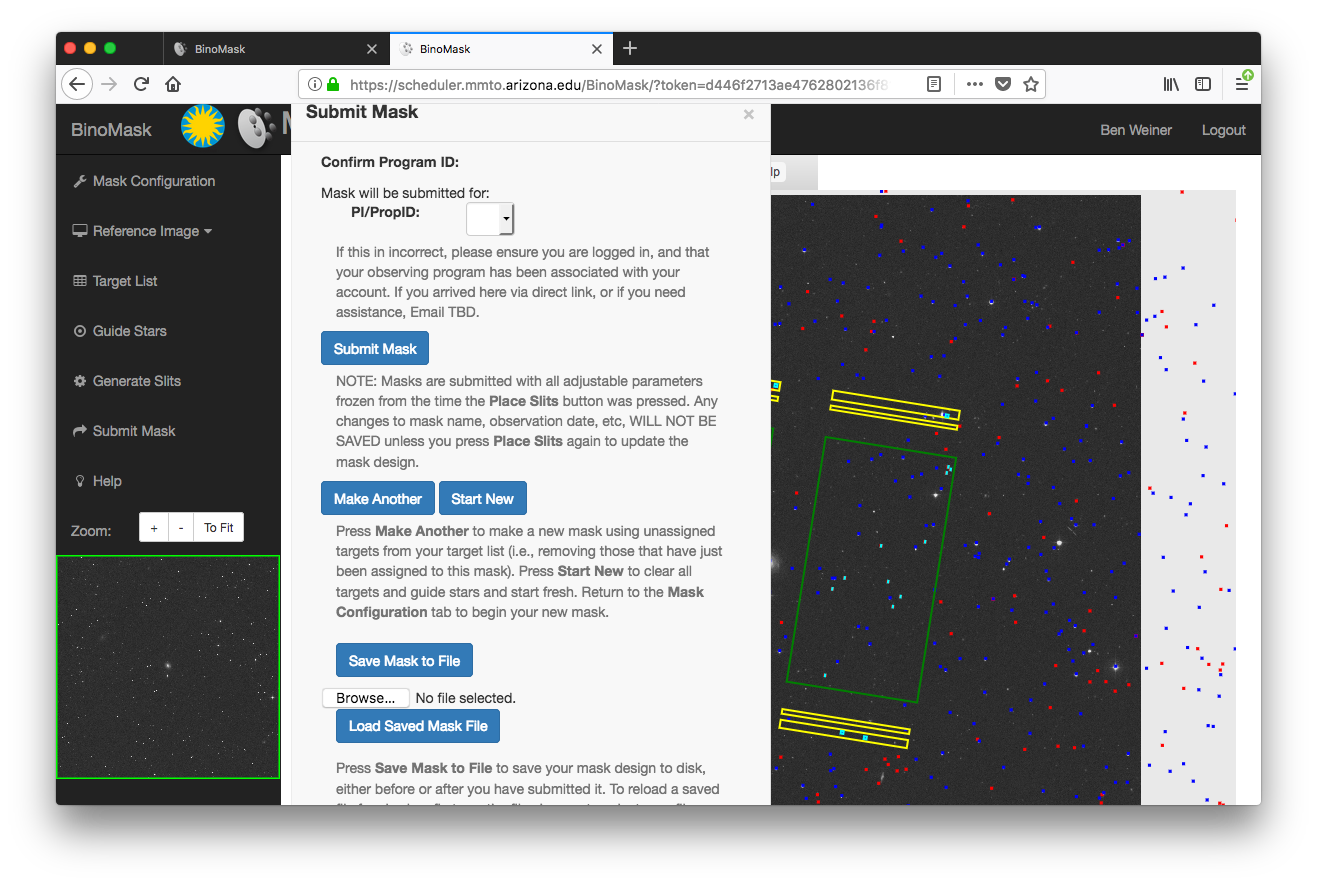
The tab for submitting your mask to the queue. After submission it will show up on your queue management page.
8. Adding your mask as a target to the queue catalog
For each observation, you need to add it as a catalog target. This will define the observing block(s) that are actually executed. This is done on your Queue Observing page. Choose “New Target” or “Add New” under the listing of Catalog Target Fields. For observation type pick Mask, and then click Already Submitted or Existing Mask and choose the name of the mask that you made. The software will extract the RA/Dec from the mask file for you. You then specify the grating and central wavelength, and on the next dialog box you specify the exposure time, number of exposures, and number of visits. The total exposure you are asking for will be the product of exposure time, exposures/visit, and number of visits.
If you don’t have special requirements you can specify all the exposures in one visit. The queue scheduler will break long observations into 2 hour observing blocks anyway for practical scheduling reasons. The number of visits isn’t critical but can be used to specify a monitoring program. For example if you wanted to get 1 hour exposure on a target for each of 4 nights, and not have all 4 hours on the same night, you could specify 3×1200 sec exposures x 4 visits, and tick the “one visit per night” box. In practice, if you have special scheduling requirements, you should write them in the notes attached to the catalog target.
Note there is a distinction between “mask” and “target.” A target is basically an observing block definition. You could use the same physical mask for more than one target. For example, you might choose to observe the same mask at two different central wavelength settings. Each would be a distinct “target” in the queue.
Notes
From the Queue Catalog page, if you click the name of a mask, it will reopen BinoMask with fewer options. This will show a Mask Configuration tab and a Save Mask tab. From Save Mask, you can click Save Mask to File. This will download a file called mask.json (on Safari it doesn’t offer a choice of name/location, just instantly downloads mask.json to my Downloads folder). This is a text file without any breaks – if you want to view it in a nice tree format, it can be uploaded to an online JSON viewer, or parsed by standard JSON parsing libraries.
Reopening / reusing older mask designs is under development, so some aspects of that interface may change.
Note that the differential atmospheric refraction across the 15 arcminute field is significant, so that the location of slitlets depends on the hour angle at which the mask is observed. In practice this means that the mask machining would change slightly depending on whether the mask is observed when HA is East or West. Thus the date and time of observation specified during mask design are significant. Observable hour angles will be taken into account during queue scheduling.
Special topics
Some special cases and black-belt techniques are discussed on the Binospec and Binomask special topics page. These include: managing large input target catalogs, creating variable minimum slit lengths, and making your own GAIA query for guide stars.
Troubleshooting
Can’t access Binomask: Normally you start from your queue catalog page and click “New Target” and “Launch Binomask.” If this takes you back to the scheduler homepage rather than starting Binomask, the problem is a stale browser cookie that keeps track of your login. We are working on fixing this. In the meantime, you can fix it by either: 1. launching a private/incognito browser session and accessing your catalog; or 2. clearing cookies in your browser for the hostname “https://scheduler.mmto.arizona.edu”; the tokens to clear are “token” and “PHPESSID”.
Load target catalog fails: Check your catalog to make sure that the field names in the header are exactly as shown here name,ra,dec,magnitude,priority,type and so on.
Placing slits fails: Check your catalog to make sure that your priority column uses either all integer priorities, or all floats. Mixing datatypes will cause an error (because Javascript and IDL typing don’t interact well). Also check to make sure that you don’t have an object with RA or Dec that is exactly integer, such as Dec = 40.0000. This will cause the same problem, and you can solve it by adding a tiny amount, eg Dec = 40.00001.
“Slits can not be made” error: This error message in the generate slits stage may mean that your selected PA or PA range is not compatible with the rotator limits and observation time. Try removing any PA constraints, or adding/subtracting 180 degrees to your PA.
“Problem connecting to backend server” error during slit placement: This means that the web process is failing to talk to the server that is actually doing the computation of allowable slit placement and optimization of number of targets and priorities. It may happen if the computational load is high or the slit placement is very demanding / takes a long time. Large input target catalogs can cause this to happen. One option is to fix the mask center position: set the “Vary Center By” RA and Dec numbers to 0 and place slits again. This speeds up the computation by a factor of 25.
Page created by
Benjamin Weiner, bjw@mmto.org